Miha Jakovac

Logo

.NET & DevOps Engineer | Cloud Specialist | Team Enabler

My name is Miha and I've been tinkering with computers for some time now. I remember getting Pentium 100 in the late '90s and that's how it all started.

Specialities:

Use Docker buildx to build .NET multi-arch-images

Nowadays, we run .NET 5,6,7,8, … apps on the Linux operating system almost without any issues. We can use Alpine MUSL linux Docker image, put the self contained .NET executable in it, install few libraries and we are good to go.

Default architecture we normally use is AMD64 with switch --platform linux-must-64 in the dotnet publish command. We can run the containers in Kubernetes on Linux, or we run it on Linux VM. No problems there.

Lately we have some developers using MacBook M2 with ARM CPU architecture, and we were struggling to run this docker container on it. You will probably not run your production on MacBook, but you can already run your apps on ARM virtual machines, so it makes sense to do that.

And because of that, we decided we needed to built a multi-arch docker image of our .NET 8 application with docker buildx. We are using MUSL Alpine Linux docker image for AMD64 and ARM64 and we build .NET assemblies outside of docker build process. You could use multi-staged Dockerfile build process.

These are the steps:

1. Enable Docker buildx

First you need to check if you have buildx module installed:

docker buildx build --help

Then create a new builder:

docker buildx create --name my-app-builder --use --bootstrap

This will run buildx container on your machine used to build the multi-arch docker images.

2. Build your app for ARM64 and AMD64

AMD64 CPU architecture:

dotnet publish "./App.csproj" -c Release --framework net8.0 --self-contained True --runtime linux-musl-x64 -o "./publish/amd64" -p:PublishTrimmed=False -p:PublishSingleFile=True -p:IncludeNativeLibrariesForSelfExtract=True -p:DebugType=None -p:DebugSymbols=False -p:EnableCompressionInSingleFile=True

To define the AMD64 CPU architecture use the --runtime linux-musl-x64.

ARM64 CPU architecture:

dotnet publish "./App.csproj" -c Release --framework net8.0 --self-contained True --runtime linux-musl-arm64 -o "./publish/arm64" -p:PublishTrimmed=False -p:PublishSingleFile=True -p:IncludeNativeLibrariesForSelfExtract=True -p:DebugType=None -p:DebugSymbols=False -p:EnableCompressionInSingleFile=True

To define the ARM64 CPU architecture use the --runtime linux-musl-arm64.

3. Change your docker file to dynamically use the TARGETPLATFORM parameter

FROM --platform=$TARGETPLATFORM alpine:3.19 AS base
EXPOSE 80
ARG TARGETARCH

WORKDIR /app

COPY --chmod=755 ["publish/${TARGETARCH}/App", "./"]

ENTRYPOINT ["./App"]

TARGETPLATFORM is injected from the --platform linux/amd64,linux/arm64 below in the buildx command.

TARGETARCH is defined by the build process and has values of amd64 or arm64. Assemblies from step 2 are copied to the correct image.

4. Run the build process

Now you can run the build process below. It will build a multi-arch Docker image for amd64 and arm64.

  • --tag assignes a tag to an image.
  • --file references a Dockerfile above.
  • --platform defines the platforms you want to build your apps for.
  • --push command automatically pushes the built docker image to your selected docker registry.
docker buildx build --tag my.dockerhub.com/app:latest --file ./Dockerfile --platform linux/amd64,linux/arm64 --push .

5. Run docker container on ARM64

Now that you have an multi-arch docker image you can run it on ARM64 CPU system with:

docker run -p 80:80 --name app --platform linux/arm64 -t my.dockerhub.com/app:latest

I hope this will help you to run your .NET apps in docker for multiple CPU architectures :)!

Read More

Implement IDistributedCache interface for Etcd key-value store

Applications sometimes need a temporary and faster cache storage to fetch data from instead of going into a database and generate response. With cache implemented, we can return just the response. Using caches brings its own challenges to invalidate it, etc.

You are probably aware of IDistributedCache interface in AspNet framework which is defining the methods for reading and writing the underlying cache infrastructure. I’ve used Redis Cache in the past, but for the sake of exercise, I’ve implemented the Etcd version of it.

Etcd is a distributed key-value store, and it’s a perfect candidate for a cache store. Read more here.

Familiar registration of the service:

builder.Services.AddEtcdCache(options =>
{
    options.ConnectionString = "http://localhost:2379";
    options.Username = "root";
    options.Password = "root";
});

Usage:

public class MyClass
{
    private readonly IDistributedCache _distributedCache;

    public MyClass(IDistributedCache distributedCache)
    {
        _distributedCache = distributedCache;
    }

    public async Task Write(string key, string value)
    {
        //Save to cache
        await _distributedCache.SetAsync(key,
            Encoding.UTF8.GetBytes(value), new DistributedCacheEntryOptions
            {
                AbsoluteExpirationRelativeToNow = TimeSpan.FromMinutes(10)
            });

        //Read from cache
        var cachedValue = await _distributedCache.GetAsync(key);
    }
    
    public async Task<string> Read(string key)
    {
        //Read from cache
        return await _distributedCache.GetAsync(key);
    }
}

You can check my first attempt to implement IDistributedCache for Etcd in my GitHub repo. More work is probably needed to add other authentication type support to the configuration and clustering. I’ll try to fill that in and create the Nuget as well.

Let me know what you think and any PR’s are welcome :).

Read More

How to read .NET Reactor license programmatically

.NET Reactor is a code protection and licensing system for .NET applications. It has SDK, that supports maintaining licenses within your devops toolkits.

I will not cover the license generation part in this post, but you can check the documentation for more details.

Normally .NET Reactor produces *.license files that can be put in the same folder as your protected application. If you want to examine the license, you can use the GUI, but I will focus on C# SDK approach.

To read a license file, you need to:

  1. Add a NuGet package Eziriz.Reactor.LicenseGenerator to your project.
  2. Have ProjectFile with MasterKey ready. If your MasterKey is not part of the project file, you need to load it separately. MasterKey is needed to decrypt the license file.
  3. Add this short piece of code:
public void ViewLicenseInformation(string projectFile, string licenseFile)
{
    //load project file with LicenseGenerator
    var licenseReader = new LicenseGenerator(projectFile);
    
    //load license file you want to inspect
    licenseReader.LoadLicenseFromFile(licenseFile);
    
    //Read license property, here is a simple example
    Console.WriteLine($"ExpiryDate: {licenseReader.ExpirationDate}");
    Console.WriteLine("Reading Additional Values:");
    
    foreach (DictionaryEntry value in licenseReader.KeyValueTable)
    {
        Console.WriteLine($"{value.Key}: {value.Value}");
    }
}

This will print out ExpiryDate and two additional custom values:

ExpiryDate: 31/12/2024 00:00:00
Company: My Company
Property1: 100000000

I hope this helps :).

Read More

Invalid string format in model validation message in .NET

I recently encountered a strange case or runtime error in System.ComponentModel.DataAnnotations namespace.

I have a model below and, with it, a few model validation attributes.

public class MyModel
{
    [Required]
    [MinLength(1)]
    [MaxLength(64)]
    [RegularExpression("^[0-9\\p{L}\\-_,.!?\\[\\]{}()<> ]*$", ErrorMessage = "is invalid. It should only contain letters, numbers, spaces, unicode and special characters ( ) [ ] { } < > - _ , . ? !")]
    [NoWhitespaceOnStartAndEnd(ErrorMessage = "is invalid. It should not start or end with space character(s).")]
    public string Name { get; set; }
}

Nothing weird on the first look. The code also compiles fine. But when I try to validate the property Name with some strange inputs, I get the exception below:

System.FormatException: Input string was not in a correct format.
   at System.Text.ValueStringBuilder.ThrowFormatInvalidString()
   at System.Text.ValueStringBuilder.AppendFormatHelper(IFormatProvider provider, String format, ReadOnlySpan`1 args)
   ...

This does not look like an error of the validator but something internally. After some digging, I discovered that ErrorMessage was the culprit. In .NET internals, I found this:

public override string FormatErrorMessage(string name)
{
    SetupRegex();

    return string.Format(CultureInfo.CurrentCulture, ErrorMessageString, name, Pattern);
}

That makes sense, the ErrorMessage string is formatted using string.Format(). I isolated the case and ran the code below a few times until I tried curly braces. I got the same error:

var str = string.Format("Miha {}");
> System.FormatException: Input string was not in a correct format.
  + System.Text.StringBuilder.FormatError()
  + System.Text.StringBuilder.AppendFormatHelper(System.IFormatProvider, string, System.ParamsArray)
  + string.FormatHelper(System.IFormatProvider, string, System.ParamsArray)
  + string.Format(string, object[])

Now let’s escape them:

> var str = string.Format("Miha {{}}");
> Console.WriteLine(str);
Result: Miha {}

Now I only need to escape curly braces { } with double curly braces {{ }} in my model validation error message to:

[RegularExpression("^[0-9\\p{L}\\-_,.!?\\[\\]{}()<> ]*$", ErrorMessage = "is invalid. It should only contain letters, numbers, spaces, unicode and special characters ( ) [ ] {{ }} < > - _ , . ? !")]

And that’s it! :D

Read More

Use Azure CLI (az) to query information from Azure Web App instances

I’ve been playing more with Azure CLI (az) lately and discovering new useful commands. From deploying new Docker images to Azure Web App service to retrieving the status of the apps.

I want to show you how you easily list the Azure Web App instances information in JSON format with Azure CLI.

First, you must download the AZ CLI.

Next, you need to log in to Azure with AZ CLI.

az login

Let’s first list all the Azure Web App instances under our Azure tenant. Then you can start querying the Azure API with AZ CLI. You can achieve this by:

az webapp list

We get back a lot of information for every instance. It’s too much useless information if you only need a status report. Let’s modify the command to introduce querying or filtering. There are five parameters I like to see in the response.

Host name of the application, state of the app (is it running?), the version of running Docker image, the parent resource group of the application.

az webapp list --query "[].{hostName: defaultHostName, state: state, image: siteConfig.linuxFxVersion, resourceGroup: resourceGroup}"

You’ll receive a smaller portion of the request data when you run this.

{
    "hostName": "myapp.azurewebsites.net",
    "image": "DOCKER|myapp.azurecr.io/myapp:latest",
    "resourceGroup": "MyApp",
    "usage": "Normal"
}

You can expand the querying filter in the AZ CLI command by running the az webapp list and choosing the values you want in your response.

Here is a shortened version of the JSON response that you get back when running az webapp list:

...
   "enabledHostNames": [
      "myapp.com",
      "yourapp.com",
    ],
    "hostNameSslStates": [
      {
        "hostType": "Standard",
...
      },
      {
        "hostType": "Standard",
...
      }
    ],
...
    "siteConfig": {
      "acrUseManagedIdentityCreds": false,
      "acrUserManagedIdentityId": null,
      "alwaysOn": true,
...

To query the first value of enabledHostNames, hostType of the second hostNameSslStates object, and alwaysOn from siteConfig, we would write this:

az webapp list --query "[].{firstHostName: enabled, secondHostType: hostNameSslStates[1].hostType, alwaysOn: siteConfig.alwaysOn}"

You should receive something similar back:

{
    "alwaysOn": true,
    "firstHostName": true,
    "secondHostType": "Standard"
}

That’s it! Another way to quickly get the status of your applications. Imagine linking the resulting JSON to a UI dashboard like Grafana!

Read More

Azure B2C Login throws errors AADB2C99059 or AADB2C90079

I am using Azure B2C as an identity server in one of my applications. Setting it up is easy, and you get a modern authentication and authorization infrastructure. We use it with an application that has a .NET back-end application and a .NET MVC front-end. I am not saying it’s the best option out there.

Because Azure AD B2C retired login.microsoftonline.com last month our MVC app did not authenticate properly anymore. We needed to update it.

When trying login to our application, we got this error:

AADB2C90079: Clients must send a client_secret when redeeming a confidential grant.

A quick google search pointed to Stackoverflow post.

I’ve changed the application type from WEB to SPA and then got another error:

AADB2C99059: The supplied request must present a code_challenge.

I opened up the front-end MVC application code and changed OpenIdConnectOptions by adding the following:

public void Configure(string name, OpenIdConnectOptions options)
{
    ...
    
    options.ResponseType = OpenIdConnectResponseType.Code;
    
    ...
}

Now the app worked because the code_challenge parameter was sent down. It’s a quick patch, but I discovered that the application used Implicit flow, which is not recommended anymore.

I’ve replaced it with Authorization code flow by removing event OnAuthorizationCodeReceived from the OpenIdConnectEvents. The OnAuthorizationCodeReceived code used client credential flow to obtain the tokens, and I decided to remove that and do the Authorization code flow.

Additionally, I’ve enabled PKCE (Proof Key for Code Exchange)

Before:

public void Configure(string name, OpenIdConnectOptions options)
{
    options.ClientId = _azureOptions.ClientId;
    options.Authority = $"{_azureOptions.Instance}/{_azureOptions.Domain}/{_azureOptions.SignUpSignInPolicyId}/v2.0";
    options.UseTokenLifetime = true;
    options.CallbackPath = $"{_azureOptions.CallbackPath}";
    options.SaveTokens = true;

    options.TokenValidationParameters = new TokenValidationParameters { NameClaimType = "name" };

    options.Events = new OpenIdConnectEvents
    {
        OnRedirectToIdentityProvider = OnRedirectToIdentityProvider,
        OnRemoteFailure = OnRemoteFailure,
        OnAuthorizationCodeReceived = OnAuthorizationCodeReceived
    };
}

After:

public void Configure(string name, OpenIdConnectOptions options)
{
    options.ClientId = _azureOptions.ClientId;
    options.Authority = $"{_azureOptions.Instance}/{_azureOptions.Domain}/{_azureOptions.SignUpSignInPolicyId}/v2.0";
    options.UseTokenLifetime = true;
    options.CallbackPath = $"{_azureOptions.CallbackPath}";
    options.SaveTokens = true;
    options.UsePkce = true;
    options.ResponseType = OpenIdConnectResponseType.Code;
                
    options.TokenValidationParameters = new TokenValidationParameters { NameClaimType = "name" };

    options.Events = new OpenIdConnectEvents
    {
        OnRedirectToIdentityProvider = OnRedirectToIdentityProvider,
        OnRemoteFailure = OnRemoteFailure
    };
}

Less code with better security! :)

Read More

Fix the Windows 11 time sync issue

Windows time was lately out of order. The time was wrong, and I wondered why.

I tried to sync it within the Windows Date&Time dashboard, but it did not work.

  • I restarted the Windows Time service, and it did not work.
  • If I set the clock manually, it was off by 1 hour.
  • I even replaced the battery on my motherboard, as some sources suggested.

Nothing worked!

Then I decided to choose a different NTP server. I went to a pool.ntp.org website and got my local NTP server: https://www.pool.ntp.org/zone/si.

In the PowerShell, I typed:

w32tm /config /manualpeerlist:si.pool.ntp.org /update
w32tm /resync

And my time was correct again! Phew!

Read More

Signing .NET assemblies in Ubuntu Linux

Signing assemblies in Ubuntu Linux with a code signing certificate is relatively straightforward. I suggest that we start by building out the application.

For Linux, we can use something like this:

dotnet publish MyProject.csproj --configuration Release --framework net6.0 --output Publish --runtime linux-x64

That will build our application with all DLL dependencies and the library it needs to run. Next, let’s go to the Ubuntu Linux terminal and install Mono development tools and OpenSSL package.

sudo apt-get install libssl-dev mono-devel

That will install the’ signcode’ tool to sign the assembly and ˙openssl˙ tool to convert our PFX certificate to the SPC and PVK files. Let’s do that next:

# extract the certificate key from the PFX
openssl pkcs12 -in mycert.pfx -nocerts -nodes -out key.pem
# convert key from PEM to PVK
openssl rsa -in key.pem -outform PVK -pvk-strong -out signing.pvk
# extract certificate from the PFX
openssl pkcs12 -in mycert.pfx -nokeys -nodes -out cert.pem
# convert cert from PEM to SPC (DER output)
openssl crl2pkcs7 -nocrl -certfile cert.pem -outform DER -out signing.spc

Now we can sign our DLL assembly with:

signcode -spc signing.spc -v signing.pvk -a sha256 -$ commercial -n MyProj -t http://timestamp.sectigo.com/ -tr 10 /mnt/c/MyProject.dll

Because we can not sign a single self-contained .NET executable

System.NotSupportedException: Cannot sign non PE files, e.g. .CAB or .MSI files (error 3).
  at Mono.Security.Authenticode.AuthenticodeBase.ReadFirstBlock () [0x00027] in <e6d76f81f5874e0ba9bb032cf8be34bf>:0
  at Mono.Security.Authenticode.AuthenticodeBase.GetHash (System.Security.Cryptography.HashAlgorithm hash) [0x0000c] in <e6d76f81f5874e0ba9bb032cf8be34bf>:0
  at Mono.Security.Authenticode.AuthenticodeFormatter.Sign (System.String fileName) [0x00013] in <e6d76f81f5874e0ba9bb032cf8be34bf>:0

we can write a script to sign all DLLs in a folder like this:

for i in $(find /mnt/c -maxdepth 1 -type f -path '*.dll')
do
    signcode -spc signing.spc -v signing.pvk -a sha1 -$ commercial -n MyProj -t http://timestamp.sectigo.com/ -tr 10 ${i}
done

Hint: You can put the above script into a sign.sh file and run it.

Now if you want to validate the signing you can run this command:

chktrust MyProject.dll
Mono CheckTrust - version 6.8.0.105
Verify if an PE executable has a valid Authenticode(tm) signature
Copyright 2002, 2003 Motus Technologies. Copyright 2004-2008 Novell. BSD licensed.

SUCCESS: MyProject.dll signature is valid
and can be traced back to a trusted root!

If you are using self-signed certificates (strongly not recommended), you will need to add the certificate to Ubuntu trusted certificate store:

sudo mkdir /usr/share/ca-certificates/extra
# convert pfx to crt
openssl pkcs12 -in mycert.pfx -out signing.crt -nokeys -clcerts
# copy crt to cert store folder
sudo cp signing.crt /usr/share/ca-certificates/extra/signing.crt
# update certificate store with new certs
sudo dpkg-reconfigure ca-certificates
sudo update-ca-certificates
Read More

Kubernetes Readiness probe with .NET 6 - part 3

In part 1, I showed you how to create a liveness probe. In part 2, startup probes.

In part 3, we will look into readiness probe endpoint. The readiness probe endpoint is a must for any system, that relies on other infrastructure, like databases, messaging systems, other micro services, cloud services like file storages, Redis, etc.

That is important, because if some of those dependant services are not running our services do not work properly. We can easily signal, that our service is operational or not by implementing readiness probe endpoint.

For sake of simplicity, I will focus on database health check and include it in the readiness probe endpoint. Let’s create it:

using System;
using Common.HealthChecks.HealthChecks;
using Microsoft.Extensions.DependencyInjection;
using Microsoft.Extensions.Diagnostics.HealthChecks;

namespace Project.HealthChecks
{
	public static partial class HealthCheckExtensions
	{
		public static IServiceCollection AddHesSqlServerHealthChecks(this IServiceCollection services,
			string connectionString)
		{
			services.AddHealthChecks()
				.AddSqlServer(connectionString,
					"SELECT 1;",
					$"SQL Server",
					HealthStatus.Unhealthy,
					new string[] { "sqlserver", Readiness },
					TimeSpan.FromSeconds(3));

			return services;
		}
	}
}

A health check will run the SELECT 1; SQL query on the database specified in the database connection string (connectionString). If the health check can not execute the query the health check will fail, meaning Kubernetes readiness probe will fail and our service will be marked as Unhealthy.

There is already a base library for writing health checks for SQL Server database (AspNetCore.HealthChecks.SqlServer). Check more libraries here.

Now let’s register the readiness probe endpoint.

using Microsoft.AspNetCore.Builder;
using Microsoft.AspNetCore.Diagnostics.HealthChecks;

namespace Project.HealthChecks
{
	public static class RegisterProbesExtensions
	{
		public static void RegisterHealthCheckProbes(this IApplicationBuilder app)
		{
			app.UseHealthChecks("/readiness",
				new HealthCheckOptions { Predicate = check => check.Tags.Contains(HealthCheckExtensions.Readiness) });
		}
	}
}

And as always, register the health check in startup.

public void ConfigureServices(IServiceCollection services)
{
    ...
    services.AddHesSqlServerHealthChecks(connectionString);
    ...
}

public void Configure(IApplicationBuilder app)
{
    ...      
    app.RegisterHealthCheckProbes();
    ...
}

Now you can run the application and go to /readiness endpoint, which should return 200 and Healthy SQL database is accessible successfully.

Now we can combine all three health check endpoints and register them like this:

using Microsoft.AspNetCore.Builder;
using Microsoft.AspNetCore.Diagnostics.HealthChecks;

namespace Project.HealthChecks
{
	public static class RegisterProbesExtensions
	{
		public static void RegisterHealthCheckProbes(this IApplicationBuilder app)
		{
			app.UseHealthChecks("/readiness",
				new HealthCheckOptions { Predicate = check => check.Tags.Contains(HealthCheckExtensions.Readiness) });

            app.UseHealthChecks("/startup",
                new HealthCheckOptions { Predicate = check => check.Tags.Contains(HealthCheckExtensions.Startup) });
                
            app.UseHealthChecks("/liveness",
                new HealthCheckOptions { Predicate = check => check.Tags.Contains(HealthCheckExtensions.Liveness) });
        }
	}
}

And

public void ConfigureServices(IServiceCollection services)
{
    ...
    services.AddHesSqlServerHealthChecks(connectionString);
    services.AddSelfCheck();
    services.AddHesStartupHealthChecks();
    services.AddSingleton<HostApplicationLifetimeEventsHostedService>();
    services.AddHostedService(p => p.GetRequiredService<HostApplicationLifetimeEventsHostedService>());
    ...
}

public void Configure(IApplicationBuilder app)
{
    ...      
    app.RegisterHealthCheckProbes();
    ...
}
Read More

Kubernetes Startup probe with .NET 6 - part 2

In part 1, I showed you how to create a liveness probe. In part 2, I will talk about startup probes.

The startup probe is a probe that pings an /startup health check endpoint on a target application when it starts. To capture that information, I’ve developed a solution to create an IHosteService implementation that will control the IHostApplicationLifetime state. The service will be registered as a singleton and started last in the ConfigureServices method.

With the solution below, we are taking care of the /startup health check endpoint and the service lifetime actions, like OnShutdown, OnStarted and on OnStopped.

Here is the code:

using System.Threading;
using System.Threading.Tasks;
using Common.HealthChecks.AppEvents;
using Microsoft.Extensions.Hosting;

namespace Project.HealthChecks
{
   public enum ServiceState
   {
	  Shutdown,
      Stopped,
	  Started
   }
	
   public class ServiceStatus
   {
	  public ServiceState State = ServiceState.Stopped;
   }
	
   public class HostApplicationLifetimeEventsHostedService : IHostedService
   {
      private readonly IHostApplicationLifetime _hostApplicationLifetime;
      public ServiceStatus ServiceStatus { get; private set; }
      
      public HostApplicationLifetimeEventsHostedService(IHostApplicationLifetime hostApplicationLifetime)
      {
         _hostApplicationLifetime = hostApplicationLifetime;
         ServiceStatus = new ServiceStatus();
      }

      public Task StartAsync(CancellationToken cancellationToken)
      {
         _hostApplicationLifetime.ApplicationStarted.Register(OnStarted);
         _hostApplicationLifetime.ApplicationStopping.Register(OnShutdown);
         _hostApplicationLifetime.ApplicationStopped.Register(OnStopped);

         return Task.CompletedTask;
      }

      public Task StopAsync(CancellationToken cancellationToken)
         => Task.CompletedTask;

      private void OnShutdown()
      {
         for (var i = 5; i > 0; i--)
         {
            ServiceStatus.State = ServiceState.Shutdown;
            Thread.Sleep(1000);
         }
      }

      private void OnStopped()
      {
         ServiceStatus.State = ServiceState.Stopped;
      }

      private void OnStarted()
      {
         ServiceStatus.State = ServiceState.Started;
      }
   }
}

Now let’s create a custom Health Check:

public class StartupHealthCheck : IHealthCheck
{
    private readonly IServiceProvider _serviceProvider;

    public StartupHealthCheck(IServiceProvider serviceProvider)
    {
        _serviceProvider = serviceProvider;
    }
		
    public async Task<HealthCheckResult> CheckHealthAsync(HealthCheckContext context,
        CancellationToken cancellationToken = default)
    {
        var hostApplicationLifetimeEventsHostedService =
            _serviceProvider.GetService<HostApplicationLifetimeEventsHostedService>();
			
        HealthCheckResult result;
        if (hostApplicationLifetimeEventsHostedService.ServiceStatus.State == ServiceState.Started)
        {
            result = HealthCheckResult.Healthy();
        }
        else
        {
            result = HealthCheckResult.Unhealthy("Service not started.");
        }

        return result;
    }
}

Next, let’s add that custom Health Check to set up the startup health check in the service container:

using System;
using Common.HealthChecks.HealthChecks;
using Microsoft.Extensions.DependencyInjection;
using Microsoft.Extensions.Diagnostics.HealthChecks;

namespace Project.HealthChecks
{
   public static partial class HealthCheckExtensions
   {
      public static IServiceCollection AddHesStartupHealthChecks(this IServiceCollection services)
      {
         services.AddHealthChecks()
            .AddCheck<StartupHealthCheck>("Service Startup",
               HealthStatus.Unhealthy,
               new[] { Startup },
               TimeSpan.FromSeconds(3));

         return services;
      }
   }
}

The code registers a health check that returns healthy status if ServiceStatus.State == ServiceState.Started;. We also set the tag of the health check to Startup, which is helpful for grouping health checks together when exposing a /startup endpoint.

The code below exposes the /startup endpoint on our service and checks all health checks with the Startup tag.

using Microsoft.AspNetCore.Builder;
using Microsoft.AspNetCore.Diagnostics.HealthChecks;

namespace Project.Extensions.HealthChecks;

public static class RegisterProbesExtensions
{
    public static void RegisterHealthCheckProbes(this IApplicationBuilder app)
    {
        app.UseHealthChecks("/startup",
         new HealthCheckOptions { Predicate = check => check.Tags.Contains(HealthCheckExtensions.Startup) });
    }
}

Now let’s register health check and HostApplicationLifetimeEventsHostedService as a singleton in the startup:

public void ConfigureServices(IServiceCollection services)
{
    ...
    services.AddHesStartupHealthChecks();
    services.AddSingleton<HostApplicationLifetimeEventsHostedService>();
    services.AddHostedService(p => p.GetRequiredService<HostApplicationLifetimeEventsHostedService>());
}

public void Configure(IApplicationBuilder app)
{
    ...      
    app.RegisterHealthCheckProbes();
    ...
}

Now you can run the application and go to /startup endpoint, which should return 200 and Healthy if HostApplicationLifetimeEventsHostedService started successfully.

Read More

Kubernetes liveness probe with .NET 6 - part 1

The Kubernetes is a container orchestrator that sweeps through the cloud-native world application development. For orchestrator to manage our applications, it needs to know its state, like:

  • Did my application start?
  • Is my application running?
  • Is my application ready to be used?

The Kubernetes (or other systems) can ping all of those endpoints every X seconds and determine what is the state of our application.

In the next 3 posts, you will read about my interpretations of /startup, /liveness and /readiness probes and how to implement them with C# and .NET 6.

First, we will start with the Liveness probe.

The liveness probe detects if the application is running and responding and returns the correct response in the case of HTTP API. Great libraries are available in .NET, which give us the health checking infrastructure.

To start implementing the liveness probe in .NET 6, you don’t need to reference any additional library. The Microsoft.Extensions.Diagnostics.HealthChecks should be included in the base framework.

Here is the code for the liveness health check:

using System;
using Microsoft.Extensions.DependencyInjection;
using Microsoft.Extensions.Diagnostics.HealthChecks;

namespace Project.Extensions.HealthChecks;

public static partial class HealthCheckExtensions
{
    public static IServiceCollection AddSelfCheck(this IServiceCollection services)
    {
        services.AddHealthChecks()
            .AddCheck("Self test",
                () => HealthCheckResult.Healthy(),
                new[] { Liveness },
                TimeSpan.FromSeconds(3));
        return services;
    }
}

The code registers a health check that returns healthy status if it executes. We also set the tag of the health check to Liveness, which is helpful for grouping health checks together when exposing a /liveness endpoint.

The code below exposes the /liveness endpoint on our service and checks all health checks with a tag Liveness. Tags are much more helpful in a /readiness probe, which I will cover in part 3 of this tutorial.

using Microsoft.AspNetCore.Builder;
using Microsoft.AspNetCore.Diagnostics.HealthChecks;

namespace Project.Extensions.HealthChecks;

public static class RegisterProbesExtensions
{
    public static void RegisterHealthCheckProbes(this IApplicationBuilder app)
    {
        app.UseHealthChecks("/liveness",
            new HealthCheckOptions { Predicate = check => check.Tags.Contains(HealthCheckExtensions.Liveness) });
    }
}

Now let’s call both functions in the startup:

public void ConfigureServices(IServiceCollection services)
{
    ...
    services.AddSelfCheck();
    ...
}

public void Configure(IApplicationBuilder app)
{
    ...      
    app.RegisterHealthCheckProbes();
    ...
}

And that’s it. Now you can run the application and go to /liveness endpoint, which should return 200 and Healthy.

Read More

Build a single executable in .NET 6.0 - update

A few months ago, I published a blog post where I described how to publish a .NET 5 self-contained single executable application.

I want to update the previous post for .NET 6, which came with a new dotnet publish argument, EnableCompressionInSingleFile. We can use it like this:

dotnet publish My.csproj --configuration Release --framework net6.0 --self-contained True --output Publish --runtime win-x64 --verbosity Normal /property:PublishTrimmed=False /property:PublishSingleFile=True /property:IncludeNativeLibrariesForSelfExtract=True /property:DebugType=None /property:DebugSymbols=False /property:EnableCompressionInSingleFile=True

The trimming of the self-contained assembly is time-consuming so compression might be a good alternative. If you combine both, you can get the perfect file size.

Below are all permutations of trimming and compression:

☒ trimming, ☒ compression - File size of 70 MB

/property:PublishTrimmed=False /property:PublishSingleFile=True /property:IncludeNativeLibrariesForSelfExtract=True /property:DebugType=None /property:DebugSymbols=False /property:EnableCompressionInSingleFile=False

☒ trimming, ☑ compression - File size of 36 MB

/property:PublishTrimmed=False /property:PublishSingleFile=True /property:IncludeNativeLibrariesForSelfExtract=True /property:DebugType=None /property:DebugSymbols=False /property:EnableCompressionInSingleFile=True

☑ Trimming, ☒ compression - File size of 25 MB

/property:PublishTrimmed=True /property:PublishSingleFile=True /property:IncludeNativeLibrariesForSelfExtract=True /property:DebugType=None /property:DebugSymbols=False /property:EnableCompressionInSingleFile=False

☑ Trimming , ☑ compression - File size of 15 MB

/property:PublishTrimmed=True /property:PublishSingleFile=True /property:IncludeNativeLibrariesForSelfExtract=True /property:DebugType=None /property:DebugSymbols=False /property:EnableCompressionInSingleFile=True

Please remember that compressed assembly will take longer to start, so if that is a concern in your application, test it out thoroughly.

Read More

Set Environment variables to Azure Container App

To run your Linux containers in Kubernetes in Azure as lean as possible, check out a new service Azure Container Apps. It is still in the preview and a bit quirky, but it worked for me in the end! I do not run any production workload on it, but I tried to run a .NET 6 Web API application for a DEMO and hit a wall setting the environment variables. After some reading and playing with CLI, I’ve compiled this short tutorial below. Stick around :).

There are many excellent guides on creating and deploying Linux containers to the Azure Container Apps, and one of them is here.

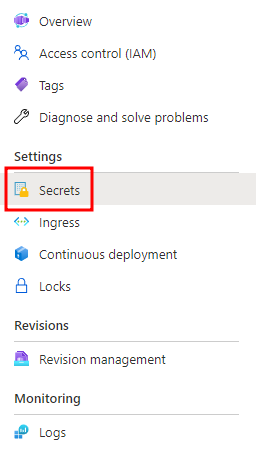
Once you log in to the Azure portal and go to your Container app, you only see the secrets menu and no configuration for environment variables (as shown in the screenshot below). Not to worry, we can set them through the az CLI. Once the service is out of preview, I expect the Azure team to implement the UI capability.

Azure container app secrets

My DEMO application is a .NET 6 Web API and needs a database connection string, so I set a secret with database-connectionstring through the Azure Portal.

Add a secret

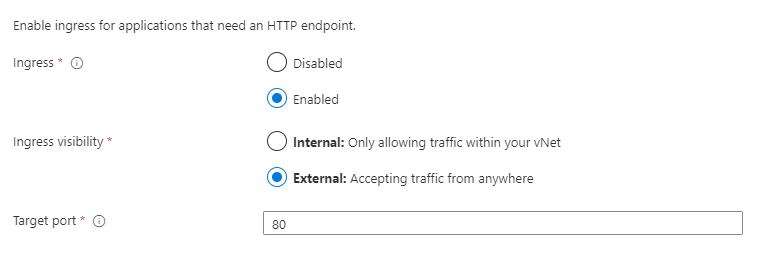
Also the Ingress is set like this:

Azure container app ingress

Next, we need to install az CLI. I’ve compiled the steps in the script below.

Alternatively, you can use in-browser CLI, by clicking on the button in the toolbar:

Azure CLI

Once you have your az CLI ready, go through the script below and set environment variables.

# Install `containerapp` module: https://docs.microsoft.com/en-us/azure/container-apps/get-started?tabs=bash. Current version:
az extension add --source https://workerappscliextension.blob.core.windows.net/azure-cli-extension/containerapp-0.2.0-py2.py3-none-any.whl
# Login to azure if not logged in yet
az login
# List your container apps and check your deployment configuration
az containerapp list --resource-group MyResourceGroup
# Set the app to listen on port 80 (or whatever you have set up)
az containerapp update -v 'ASPNETCORE_URLS=http://+:80' --resource-group=MyResourceGroup --name my-container-app
az containerapp update -v 'urls=http://+:80' --resource-group=MyResourceGroup --name my-container-app
# use __ for nested configuration
az containerapp update -v 'MyService__Setting1=1' --resource-group=MyResourceGroup --name my-container-app
# Link more complex variables through secrets. You first need to create a secret with a name 'database-connectionstring' and set it to the environment variable 'MyService__Database__ConnectionString'
az containerapp update -v 'MyService__Database__ConnectionString=secretref:database-connectionstring' --resource-group=MyResourceGroup --name my-container-app

Azure Container Apps is a good service that abstracts all the complexity away from us to focus more on developing our applications. Let’s see what is next in coming months. :)

Read More

Azure Web App for Linux Containers timeouts on start-up

Lately, I have been dealing with deployment to Azure Web Apps for Linux containers. It’s a simple-to-use service for running Linux containers.

But with easy-to-use Azure Web App service came issues, which I first credited to Azure service. And I was wrong.

I’ve created a .NET 5 Web API project and run it on my development machine. It worked fine until I wanted to deploy the application to Azure Web App for Linux containers. When doing that, I spotted an issue every time the Azure Web App ran the container. The application was listening on port 5000:

Now listening on: http://localhost:5000

Why 5000? Where did I set that? I went back to my development machine and checked there. It was the same thing. The only difference was that it listened in HTTP and HTTPS ports 5000 and 5001, respectively. I could not change this behavior by changing the ports like I usually did in a profile of launchSettings.json or by providing ASPNETCORE_URLS and NETCORE_URLS environment parameters. For example:

ASPNETCORE_URLS "http://+:8080"
NETCORE_URLS "http://+:8080"

It did not help. The app was still listening on the 5000 and 5001 ports. Is that .NET 5 specific? Am I doing something wrong? I am not sure and would sure like to know :).

After some searching online, I found that I could also specify URLs differently as urls parameter in an appsettings.json or as an environment variable. appsettings.json

{
  "urls": "http://+:80;https://+:5001",
...

And that did the trick! My app was not listening on ports 80 and 5001 on my development machine.

Before I went back to the Azure portal, I exposed a port 80 in the Dockerfile. I do not need an HTTPS port there.

EXPOSE 80

And on the Azure portal, I set the urls parameter in the Configuration > Application Settings > New application settings and set it like this:

 {
    "name": "urls",
    "value": "http://+:80",
    "slotSetting": false
  },

One setting that I find helpful is the WEBSITES_CONTAINER_START_TIME_LIMIT, which specifies the time limit for Web App to wait for the container to start up. A Web App will try to ping your container at port 80 and determine if it’s up and ready to be served. After that time limit, the Web App timeouts and retries. The default value is 230 seconds, but I set it to 60 seconds. It’s enough for my application. You can set it up at Configuration > Application Settings > New application settings.

An excellent resource on GitHub might help you if you have similar issues. It looks like this topic has been dragging along for a few years now!

Read More